FindRazorSourceFile.WebAssembly
1.0.0-preview.16.0
dotnet add package FindRazorSourceFile.WebAssembly --version 1.0.0-preview.16.0
NuGet\Install-Package FindRazorSourceFile.WebAssembly -Version 1.0.0-preview.16.0
<PackageReference Include="FindRazorSourceFile.WebAssembly" Version="1.0.0-preview.16.0" />
<PackageVersion Include="FindRazorSourceFile.WebAssembly" Version="1.0.0-preview.16.0" />
<PackageReference Include="FindRazorSourceFile.WebAssembly" />
paket add FindRazorSourceFile.WebAssembly --version 1.0.0-preview.16.0
#r "nuget: FindRazorSourceFile.WebAssembly, 1.0.0-preview.16.0"
#:package FindRazorSourceFile.WebAssembly@1.0.0-preview.16.0
#addin nuget:?package=FindRazorSourceFile.WebAssembly&version=1.0.0-preview.16.0&prerelease
#tool nuget:?package=FindRazorSourceFile.WebAssembly&version=1.0.0-preview.16.0&prerelease
FindRazorSourceFile


What's this?
This package enables your Blazor apps to display the source .razor file name that generated the HTML element under the mouse cursor when you press the Ctrl + Shift + F hotkeys.
For a quick visual overview, watch Jimmy Engström’s introduction video:

1. Installation
Add the FindRazorSourceFile NuGet package to your Blazor Application or Razor Class Library (RCL) projects.
> dotnet add package FindRazorSourceFile
The FindRazorSourceFile NuGet package ensures that CSS scope IDs are generated for all .razor files in your projects, which is required for the detection feature to work.
If your Blazor app uses the .NET 8 or later "Blazor Web App" project template, you will find two projects in your solution: a server-side project and a client-side project. In this case, you need to install the FindRazorSourceFile NuGet package in both projects.
That's all you need to do to install the FindRazorSourceFile feature in your Blazor app!
The functionality of FindRazorSourceFile is disabled when the target configuration is "Release". This means any resources from FindRazorSourceFile won't be loaded in the app after it is published. So, you don't need to worry about increasing the app size in the release environment due to referencing this package. If you need to suppress loading resources from this library in other configurations, set the EnableFindRazorSourceFile property to false in the project file. For example: <EnableFindRazorSourceFile>false</EnableFindRazorSourceFile>.
Since version 1.0.0-preview.15, the FindRazorSourceFile package is unified for all Blazor platforms, including Blazor WebAssembly, Blazor Server, and Razor Class Libraries (RCL). You no longer need to choose a specific package based on your Blazor platform.
If you are migrating from previous versions, please refer to the Migration Guide for instructions on how to update your project.
2. Usage
2-1. Entering "Inspection Mode"
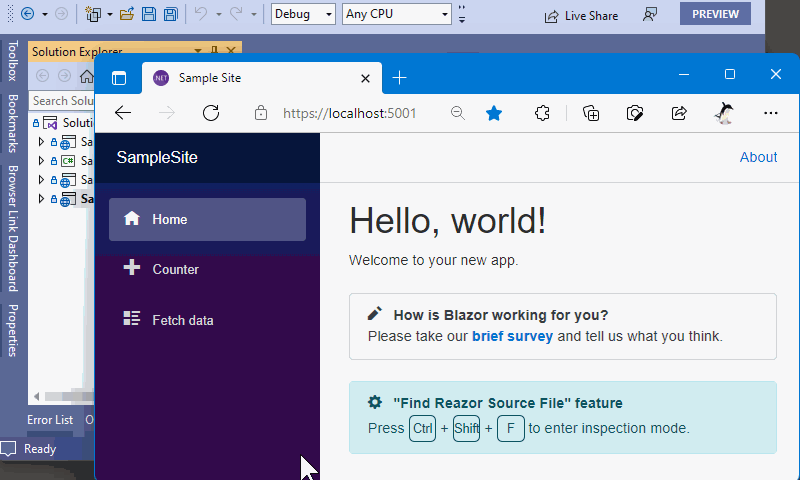
After installing FindRazorSourceFile in your Blazor project, the Blazor app running in a web browser will respond to the Ctrl + Shift + F keyboard shortcut and enter "Inspection Mode".
When the app enters "Inspection Mode," the entire browser screen will dim.
In this state, as you move the mouse cursor, the HTML element under the cursor will be highlighted, and a tooltip displaying the source .razor file name that generated that HTML element will appear.
2-2. Entering "Lock Mode"
When you click an HTML element during "Inspection Mode", the application will enter "Lock Mode".
In "Lock Mode", hovering the mouse cursor over other HTML elements will have no effect.
The highlighting and tooltip for the selected HTML element will remain visible.
This mode is helpful for selecting and copying the source .razor file name displayed in the tooltip.
2-3. Exiting Modes
To exit these modes, press the ESC key.
Additionally, clicking the mouse during "Lock Mode" will exit that mode and return to "Inspection Mode".
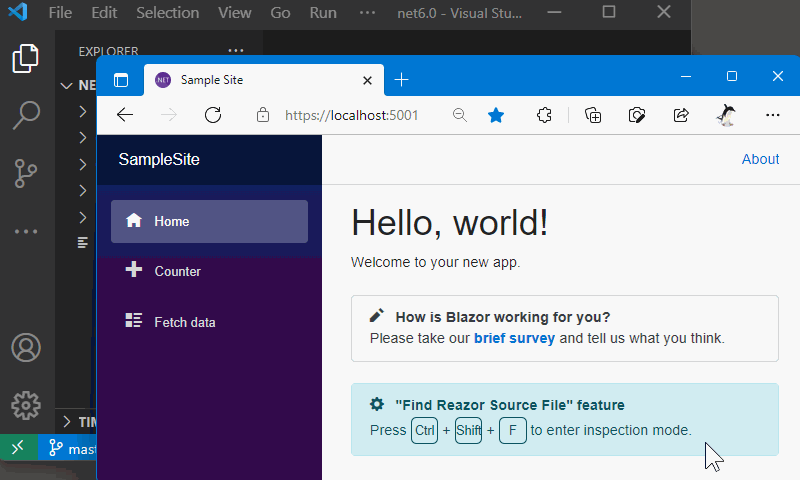
3. Open in Visual Studio Code
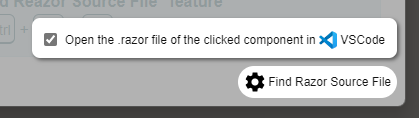
Once you enable the "Open the .razor file of the clicked component in VSCode" option from the "Find Razor Source File" settings button, located in the bottom-right corner of the page,
the .razor file of the component you clicked on will be opened in Visual Studio Code.
4. Open in Visual Studio IDE - Visual Studio Extension for "FindRazorSourceFile"
If you are using Visual Studio IDE on Windows, please check out the Visual Studio Extension "Find Razor Source File - Browser Link Extension / VS2022 Extension" from the URLs below.
- for Visual Studio 2019 - https://marketplace.visualstudio.com/items?itemName=jsakamoto.findrazorsource-browserlink-vsix
- for Visual Studio 2022 - https://marketplace.visualstudio.com/items?itemName=jsakamoto.findrazorsource-browserlink-vsix-2022
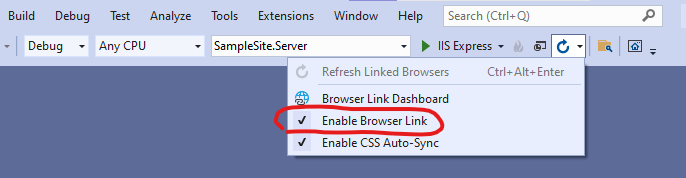
If you have installed the extension in your Visual Studio IDE and configured everything required to enable the "BrowserLink" feature, entering "Lock Mode" will automatically open the .razor file that generated the clicked HTML element in Visual Studio!
4-1. Requirements
- Visual Studio 2019 or 2022
4-2. Usage
To enable the "Find Razor Source File - Browser Link Extension / VS2022 Extension", please follow the instructions below.
Ensure the target project has the "FindRazorSourceFile" feature installed, and confirm that "Inspection Mode" and "Lock Mode" work correctly in a web browser.
Enable "Browser Link" from the dropdown menu in the Visual Studio toolbar.
If you are using Visual Studio 2019, follow the additional steps below:
<details> <summary>Additional steps for VS2019</summary>
- Add the
Microsoft.VisualStudio.Web.BrowserLinkNuGet package to your Blazor Server or ASP.NET Core host project.
> dotnet add package Microsoft.VisualStudio.Web.BrowserLink
- Call the
UseBrowserLink()extension method forIApplicationBuilderat the startup of your Blazor Server app or ASP.NET Core host app.
// In "Startup.cs" of a Server app.
  ...
  public void Configure(IApplicationBuilder app, ...)
  {
    if (env.IsDevelopment())
    {
      ...
      app.UseBrowserLink(); // 👈 Add this line.
      ...
    }
    ...
IMPORTANT NOTICE: Place the call to UseBrowserLink() before calling UseFindRazorSourceFile() if the project is a Blazor Server app.
</details>
After completing all the steps above and launching the project, the .razor source file will open in Visual Studio when you click an HTML element in "Inspection Mode" in your web browser! 👍
5. Limitations
FindRazorSourceFile identifies the original .razor file that generated a DOM element by relying on Blazor's "Isolated CSS" mechanism. Specifically, it traces back to the source file using the automatically injected CSS scope IDs (e.g., b-xxxxx) assigned to HTML elements during rendering.
Due to this reliance on CSS scope IDs, there are several limitations:
- Components Without Direct HTML Elements: If a
.razorfile contains only child components (and no direct HTML elements), no CSS scope ID is injected for that file. As a result, FindRazorSourceFile cannot detect such components in the rendered DOM. - Ambiguous boundaries in complex components: If a component contains multiple root-level HTML elements, the tool may misidentify component boundaries or highlight unexpected regions in the DOM.
These behaviors are inherent to the current implementation, which depends exclusively on CSS scope IDs to determine the source of rendered DOM elements.
To overcome these limitations, you can use the explicit component detection mechanism described in the next section.
6. Improved Component Detection with FRSF_BEGIN_COMPONENT / FRSF_END_COMPONENT
To overcome the limitations described above, FindRazorSourceFile provides a mechanism for explicit component boundary marking using static methods: FRSF_BEGIN_COMPONENT and FRSF_END_COMPONENT. By manually adding these markers to your .razor files, you can significantly improve the accuracy of component detection, even for components without direct HTML elements or with multiple root-level elements.
How to Use
- Import the static methods
In your project's_Imports.razor, add the following line:
@using static FindRazorSourceFile.FindRazorSourceFileMarker
- Add markers to your component
At the beginning and end of your.razorfile, insert calls to these static methods:
@FRSF_BEGIN_COMPONENT() @* 👈 Add this line, and... *@

@page "/"
<h1>Hello, world!</h1>
<p>Welcome to your new app.</p>

@FRSF_END_COMPONENT() @* 👈 add this line. *@
This will cause FindRazorSourceFile to inject special comment markers into the rendered DOM, allowing it to accurately associate DOM regions with the correct .razor file.
Notes on Debug and Release Builds
Debug builds:
When building in Debug configuration, the full path of the.razorfile is embedded in the assembly and included in the marker comments. Be aware of potential security implications if you deploy Debug builds.Release builds:
In Release configuration, no.razorfile paths are embedded, and the marker comments are not emitted. This ensures there is no impact on performance or assembly size in production.
By using these explicit markers, you can resolve the detection limitations and achieve precise mapping between DOM elements and their source .razor files.
License
Learn more about Target Frameworks and .NET Standard.
-
net8.0
- FindRazorSourceFile (>= 1.0.0-preview.16.0)
- Microsoft.AspNetCore.Components.WebAssembly (>= 8.0.0)
-
net9.0
- FindRazorSourceFile (>= 1.0.0-preview.16.0)
- Microsoft.AspNetCore.Components.WebAssembly (>= 9.0.0)
NuGet packages
This package is not used by any NuGet packages.
GitHub repositories
This package is not used by any popular GitHub repositories.
| Version | Downloads | Last Updated | |
|---|---|---|---|
| 1.0.0-preview.16.0 | 248 | 6/23/2025 | |
| 1.0.0-preview.15.0 | 492 | 6/11/2025 | |
| 1.0.0-preview.14.0 | 362 | 6/3/2025 |
v.1.0.0-preview.16.0
- Fix: An "Unable to create directory" error occurred when an absolute path was specified in the `BaseIntermediateOutputPath` MSBuild property (Issue #8).
To see all the change logs, please visit the following URL.
- https://github.com/jsakamoto/FindRazorSourceFile/blob/master/FindRazorSourceFile.WebAssembly/RELEASE-NOTES.txt